Friday, May 11, 2012

Creating Princess Silhouette's Bodice

Creating Princess Silhouette's bodice was relatively straight forward after creating Princess Colour's. I used the same technique of 2inch strips cut with pinking sheers and placed at a diagonal. However for this one I have them going the opposite way so they created a true V, meeting at the bottom rather than at the neck-line. Also because the base fabric is so shiny I haven't left any of it exposed but placed a light black netting in the opening to tone down the shine. Unfortunately I only have a photograph of the back.

Although this isn't a great photograph I think it shows the general idea. I used three different types of black fabric and incorporated one piece of wide lace on either side of the centre back. I'm very pleased with how this bodice turned out an am excited to see how it looks with the rest of the decoration.

Wednesday, May 9, 2012

Princess Silhouette Skirt Development

After making the skirt for Princess Colour I thought making the skirt for Princess Silhouette would be a bit more straight forward. In some ways it was. I knew my panel patterns worked well and kind of the process of creating the sheer panels and the solid ones. But this process was a bit different because it was about creating depth and texture and not at all about mixing together colour.
Gibb, S. and Jones, U. (2009). The Princess Who Had No Kingdom. London: Orchard Books.
Original design
To start creating this skirt I started with the solid bottom panels and then I created the laser cut ones. This way I could put together the bottom two layers on together rather than just one at a time. I really enjoyed experimenting with black on black fabrics, putting in as much contrast and texture as I could.
I think these bottom two layers really came together well. I felt like it was a bit of a risk using the grey sheer fabric but it does add a new dimensionality to the skirt. And since more black layers will be going over top it shouldn't be too noticeable. I then had to start creating the middle layers. I quickly realized that I did a much better job fabric shopping for this costume than for the other. I had more textural fabric with pieces like a black flocked fabric and a subtle hounds-tooth print. And because of this I could create tabs of just the fabric without any decoration and therefore made more tabs more quickly. This was particularly helpful in adding depth and texture; the more tabs the better!


The skirt above came together a lot faster than the colour one and I feel like it is just as successful. One of the challenges in creating the this skirt has been to incorporate the lighter colours that you can see in the design (where the patterns are really shown off). At first I thought that maybe I could use some of the lighter fabric from the other dress but I wasn't sure how to use it in a subtle way. I discovered that I could use the big sheet of fabric that all the laser cut shapes came from mounted on silk organza to create lighter pattern. This worked well because there was more black than cream but still defined shapes and because the organza is sheer it isn't a startling light colour. Having mostly completed the skirt it is interesting to see that it is a slightly different shape than the colour skirt. This must have to do with the fact that has a different understructure. But since the rings are the same size I didn't think it would make as much of a difference. However the open cage which I think is a bit shorter than the hoop, has more of dramatic rounded shape, where as the colour is just a bit more gradual.

Saturday, May 5, 2012

Decorating Princess Colour's Bodice

When it came time to decorate the bodice I can admit I was lost. I really felt like this is where I want a designer to help me decide what to do. The illustration is both clear and un-clear on how the bodice should look. It is very clear that it has pink decoration on the front and a rounded neckline with some kind of black decoration. It also vaguely shows that it is layered with multiple colours evoking more of the grey and brownish tones of the skirt.
Gibb, S. and Jones, U. (2009). The Princess Who Had No Kingdom. London: Orchard Books.
I thought that mixing the fabrics for the bodice would help the layered look come together, but once I started draping I can see that it might make it more difficult. This was my first attempt at just doing some basic draping:
 It is clear that the rouched fabric doesn't really work. It is too dense and not light enough. I also don't think it evokes enough colour and texture. In talks with my tutor she also agreed it wasn't really working and suggested that I focus on the skirt a little more and then let that inform my bodice decoration.

After I've been working and developing the skirt I was ready to give it another go. I thought that it would be clever to use scraps from all the fabrics on the skirt and piece together a bodice covering from those scraps. I thought that this would really bring everything together. I did stitch together a little sample but it looked awful, it was clear that not all the fabrics looked right over the fabrics of the bodice and that they didn't go well enough together. And the machine stitching was too heavy and visible. I scrapped that idea without a second thought. Instead I began to piece on scraps with the bodice on the stand, being a little more careful about what fabrics I used and where the went. I thought that maybe I could just hand-sew them on which would eliminate the heavy machine stitching. I was undecided about this technique and decided I needed to try something else to compare it to. I've realised throughout this project that I like uniform things, I like having a pattern to follow or at least a system. So instead of piecing things on randomly I decided to play to my strengths and creating a pattern type system. I chose three fabrics that I really felt looked good over the bodice base and cut them into 2 inch strips using my pinking shears and then layered them on in a diagonal across the bodice. Here are the two techniques side by side:


I think it is extremely clear which one is better. The strips on the right are more uniform and more purposeful. They show off the under fabric a lot better than just the random pieces. I shouldn't have worried about using every single fabric that was on the skirt; there is going to be plenty of other decoration on the bodice that will certainly help tie everything together. By having just the three essential fabrics it tones it down without looking too busy. I also think this will be easier to attach. I can do straight lines of prick-stitches instead of having to go around different size pieces.

Friday, May 4, 2012

Princess Colour Skirt Development


 Developing the skirt for Princess Colour has been both exciting and stressful. I was really unsure how to even start this process but I thought I should make patterns for the tabs rather than just experimentally cut all the pieces. I think this fits the design more because it does have a certain uniformity. I knew that from making the calico pieces that it can also waste fabric by just experimenting. By just having a couple of different tab patterns in different length I can focus more on the decoration and texture rather than the size. What I've found a bit difficult about creating the skirt is knowing what colours to use and how many is too many or too few. I want it to look effortless like the design. What I started with was what I knew I needed and had a clearer vision of from the design: the laser cut patterns. I've really enjoyed seeing my laser cutting come to life appliquéd onto the tabs. It is an easy and rewarding process and I think the result is perfect for my design.


Gibb, S. and Jones, U. (2009). The Princess Who Had No Kingdom. London: Orchard Books.
The Original Design
My first attempt

 I am really really pleased with how the skirt looks with the laser cutting. When I was applying all the different shapes I really tried to look at my illustration for reference so that I could try to emulate her patterns with my different shapes. However this was just all of those panels and I will need to fill in with other panels. The question I wasn't really sure how to answer was: should they be solid fabric or sheer, should they be decorated or plain, how many, what length.  When looking at all my fabrics on the table I realized that I had bought some that no longer really worked colour wise, so I eliminated using those and instead focused on the ones that looked most like the design. My tutor also suggested using the fabrics from the bodice. I was sceptical at first about this but after making a few they really fit in well.


  These are the two bottom layers after some new tabs and a bit of reconfiguration. I think they look a lot more like the illustration. It still retains it's lightness which is really important to me but the solid layers underneath add so much more depth  as well. I've some more middle and top layers to create but with this start I really feel I can move forward more successfully. Creating even just this much of skirt has really tested my ability to make design decisions. I've learned just to be bold and use a lot of pins!

Saturday, April 28, 2012

Decorating the Underskirts

Throughout this project I've tried to really pay attention to the small details. Because there are a lot pieces and a lot of movement in the skirt I didn't want to ignore the base skirts. In the book the Princess does go to a ball and dance, and in a performance with all that movement I wouldn't want the underskirt to be plain if it might be seen. So I've decided to just do some small decoration around the base kind of relating to both eras the bodice's are taken from. It is also helpful to decorate and finish the skirts now so that when all the layers are on I won't have to struggle to do the hem or decorate it.

Princess Colour:
Lambert, M. (1991) Fashion in Photography 1860-1880. London: B.T. Batsford.
 I really love this photograph from 1870. I think it has a great subtlety of style and I especially like the different layers of decoration on the skirt.


I tried to evoke the style of layered decoration from the old photograph in my underskirt. I didn't want the decoration to be over-whelming and over-all very whimsical and sweet. The lace is actually the negative of the lace that I used to decorate the hoop skirt that is under it. The black lace is threaded through with some pink wool. Aside from adding visual interest I also like this because it is, in it's essence) all the colours that the over-dress will have on it: pink, cream, and black. I'm very happy with this decoration.


Princess Silhouette:
Kyoto Costume Institute. (2002) Fashion: A History from the 18th Century to 20th
                             Century. Hong Kong: Taschen.
This 18th century dress (with a close up on the right) contains some of my favourite decoration from this era. It is very romantic and very rococo! From this I took the kind of wavey type trim that is a bit more narrow.

Although this isn't a very colourful trim like on Princess Colour I feel it really adds a lot to the underskirt. The matte tone of the cotton against the shiny fabric adds a bit more depth and tones down the brightness a lot. Creating this trim was very easy with just some pinking shears, fray check, and lots of strips; but it really does add another element to the skirt. I like that it makes it look more decadent and stylish, which Princess Silhouette is. I also added a very thin line of simple black lace to cover up the machine stitching on the hem.

Wednesday, April 25, 2012

Princess Silhouette Second Dress Fitting

 Today I had my second fitting (or first fitting in top fabric) for Princess Silhouette. I was anxious about this fitting because I did the toile fitting on my own so my tutor hadn't seen this dress at all. Luckily it went very well and I am pleased with the results. Again I would like to apologize for the horrible fabric that looks even worse in the pictures!
Front View Before Alterations

Back View Before Alterations
There were only a few easy adjustments to fit that needed to happen on this dress. By taking it in at the shoulder seam the dress sat a bit better and a little tighter. The neck-line, that I was worried was going to be too low, actually needed to be taken down. This wasn't according to the design but to where the corset neck-line was underneath. Having the dress sit high above the corset didn't look right, but by moving it down and building up the neck-line with decoration both the design and the fit will be much better.

Front neck line with alterations
Back with Alterations
A few other small alterations were made to the front like taking in the dart at the neck a little more and adjusting the width of the straps. The sleeves were more comfortable this time and the right length. I used the same sleeve from the first fitting but the cotton organdie was looking a bit rough, so I added a little strip to sit in with the sleeve to make it stronger. The strip was pleated and need to be moved around so that the pleats sat more in the front. Last but not least, the entire bodice needed to be backed in stayflex. The best and most improving alteration was taking up the skirt. It makes a huge difference to have the skirt at the right length.

Dress After Alterations

Evaluation:
 I feel like this fitting was a big success. I was happy to see everything come together, like it did on the other dress. But I was also happy that it only had minor fit alterations, since I did the toile fitting on my own. I really tried in this fitting to figure out what alterations needed to be done on my own; checking with my tutor but taking the lead. Doing this has given me more confidence going into fittings, which will be key when working outside of university. I think this fitting has also showed me how important the right fabric selection is. I don't think this fabric looks particularly nice, and not just in photographs! But I do think it works because it is so shiny and this costume does really need to have a lot of depth. I could have used a plain black cotton but I wanted to start with a strong base and build on that and I think this fabric fills that need. This was a very positive and encouraging second fitting.


Wednesday, April 18, 2012

Princess Colour Second Dress Fitting

Today I had my second fitting for Princess Colour. For this fitting I had only the base layer of top fabrics without any type of decoration so I could focus on fit and functionality. I'll admit I was nervous about this fitting, probably more so than any of the others. I was mostly worried about the fit because the two fabrics I had made the bodice out of were really stretchy and even though I had backed them in stayflex there was the worry that they wouldn't hold the shape of a 19th century bodice. I also wasn't entirely pleased with how the underskirt looked. I know that it is all going to be covered up and to just be happy with the colour but I was still worried. It all ended up working out and I was pleased with the final result.
Here is the dress before any alterations:
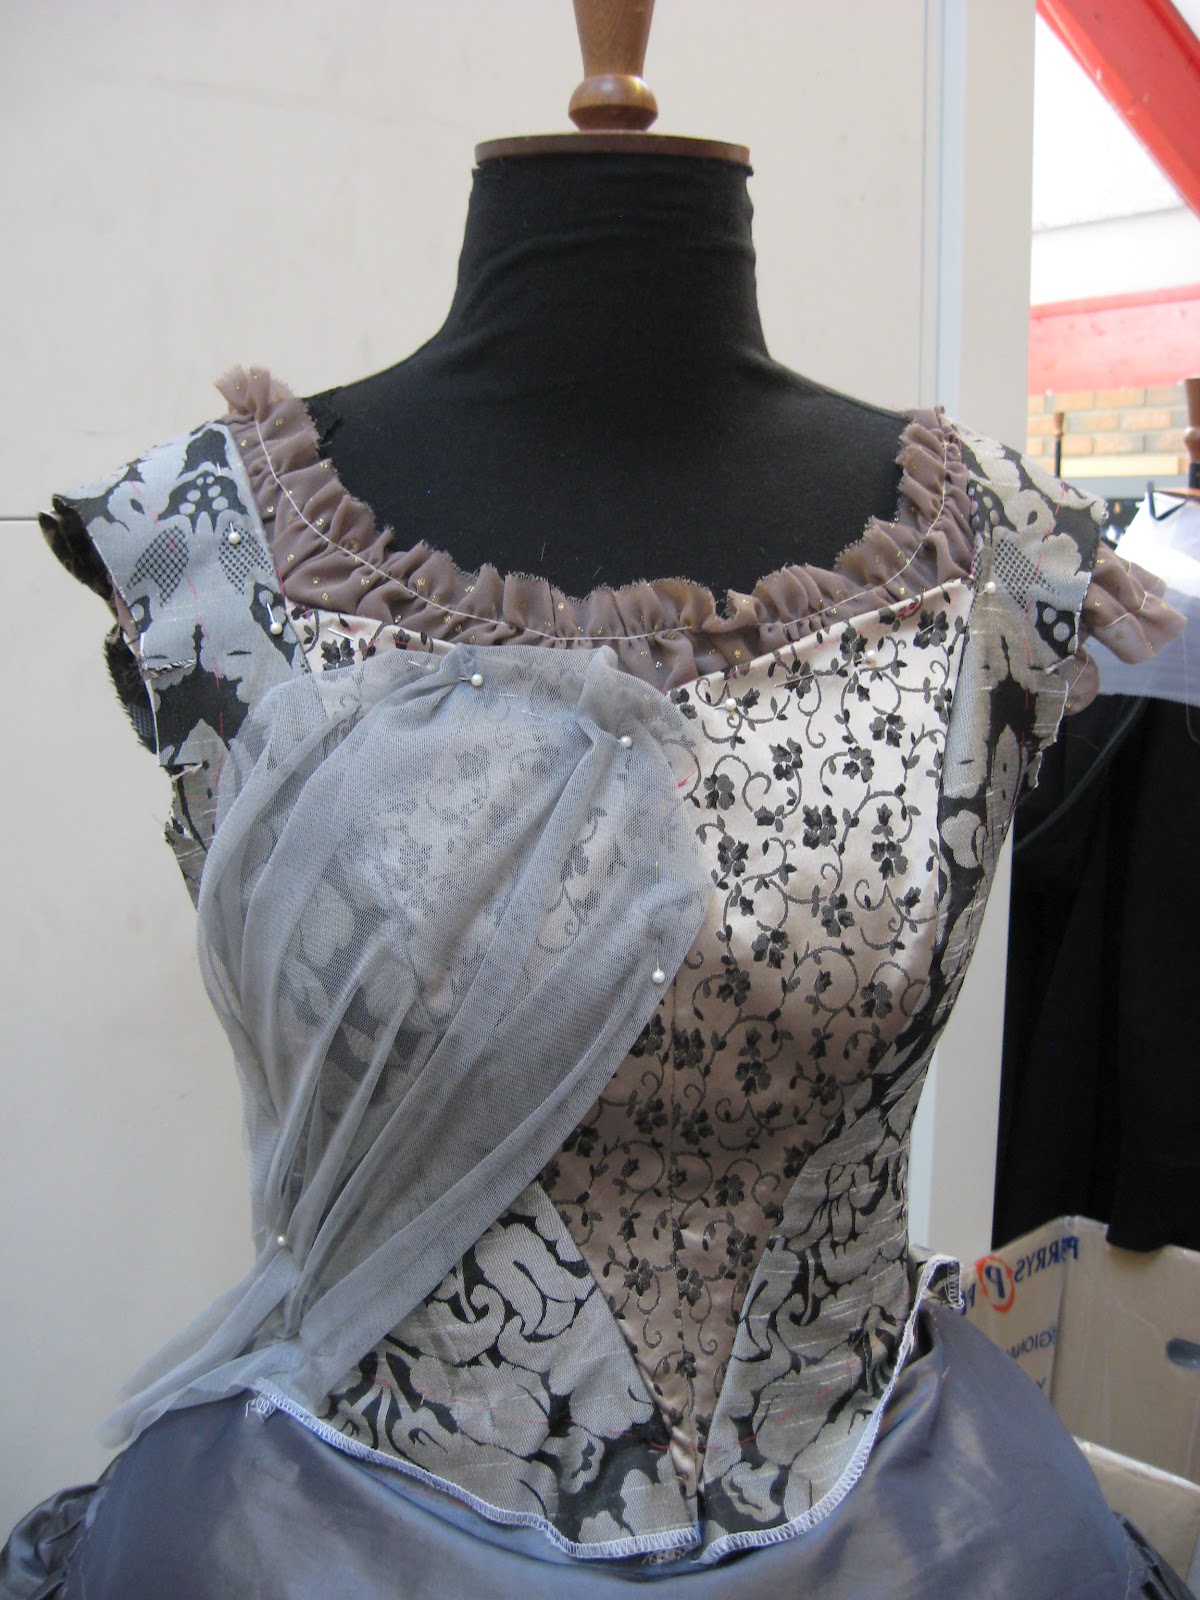
I think it's very apparent the things that needed to be fixed first. Both the hem on the skirt which is much too long and the neck-line on the bodice which is much too high. I will start with the bodice alterations.

The bodice neck-line was the first thing that needed to be altered. Unlike the toile fitting this neck-line sat rather high in comparison and stuck out in the middle because of the two centre front bones. My tutor suggested just making a dart where the CF piece and the Side Front pieces meet. This really helped the front lay flat and when the bones were taken out created a much more pleasing neck-line. This also made the straps more narrow. Comparing it to the design I didn't think this was a bad thing at all. I actually liked it better; and although the neck is a bit more rounded in the design that can all be filled out with the trim I will be applying to the neck. We could have also moved the sleeve over a bit but it was comfortable for Rose (model) and it sat at a nice place on her shoulder so that remained the same. The length of the sleeve was also okay with a little bit of gathering, I will probably use a drawstring for the final sleeve.
Front with Alterations

Close up of Front with Alterations
The back of the bodice also needed a few alterations. Unfortunately it didn't line up with my original Centre Back line. It was a bit too small in some places and I think I learned something very valuable about working with stretchy fabric like this. I didn't include the seam allowance when I cut out my stayflex and that was fine on all the other pieces except for the centre back. I should have stayflexed the 2inch seam allowance so that when I did the fitting I could get a really accurate line. Instead the fabric pulled a bit instead of staying straight so I will have to be careful when making the alterations to the back pieces. The other alteration in the back was to bring the seam of the skirt up more to sit higher on the bodice. This eliminates the little creases and the need for an extra bone in the side back piece.
Raised Skirt Line on Back
Moving on the the skirt. The only alteration on that I am happy to say was to bring it up to higher position; just a little bit longer than the hoop underneath. I've got plans for some trimming along the bottom just in case it shows as well and that way I can quickly machine the hem and cover it in lace. We also pined on a sample triangle piece I had from my toile fitting to compare the length and such. This was good because it gave me the length of the longest triangle as well.
Dress with Final Alterations
Side View with Final Alterations
Back View with Final Alterations
Evaluation:

I had a lot of nerves going into this fitting. I was concerned about my fabrics and the fit. Both ended up working really well and I am pleased with the result. Having the garment on a person really makes a massive difference to how everything looks and it was a positive difference in this case. My tutor had me first go around and make the changes I felt needed to be made. I think this was helpful and a good experience when I have to do it on my own after university. But I was also very thankful for her help. I did really try to give my opinion and my ideas and I felt I communicated better. This kind of analytical problem solving approach is a good mind-set to be in for a fitting and something I will remember in future fittings. I also felt more prepared with design things for this fitting. I had extra fabric for the sleeve and my laser cutting designs to show how I was going to progress and continue on with all my design ideas. I feel like this was a very positive fitting in that I made the appropriate alterations but also took more initiative in making the alterations myself (with a little help of course!).