Thursday, October 13, 2011

Trip to History In the Making


At the beginning of this project I was really struggling to find research on WWI army trousers. Especially the waistband of the trousers because most historical photographs are more formal and usually include the jacket. I was able to find some good pattern examples and had found a great photograph of the back of trousers so I knew I was going to do a fish-tail back but I was unsure about the pockets and the fastenings on the front. To gain some more insight I traveled to History in the Making: Historical Reconstruction Specialists in Portsmouth. They are a costume hire house that specializes in historical recreations, with a large section devoted to the military. For more information on History in the Making here is their website: http://www.history-making.com/

I was very lucky to get the opportunity to enhance my research and technical understanding of WWI trousers by looking at a recreated pair in a professional hire house. I was shown around by one of the owners Hamish who took me to the WWI section. With his guidance I was able to look through their stock and pick out a pair that would fit the rank of the character of Soldier. I also got to look at costumes for higher ranking officers as well as an original WWI jacket. Once selected I sat down with the trousers to take numerous photographs, notes and measurements. Here are just a few of the photos I took:


This is just a small sampling of the pictures that I took. I started from the outside taking photographs then flipped them inside out to look at how they were constructed and to take photographs. This is where I started making measurements. Some of the things I measured that I felt might be useful when I make my pair were: seam allowances, size of cotton waist-band lining, pocket length, location of buttons, fly front size and length, location of top-stitching, button hole size and hem size. 

Evaluation: By taking measurements and taking time to look at each component I feel I better understand how the trousers will be/could be put together. There may be some differences between this historically made pair and my costumed pair but with the knowledge of how the historical pair was made, as my base, I can build and alter to fit my character. This was also a chance to see the level of work put into this pair in a professional setting and has given me good idea of the level to which I have to work in a setting like History in the Making. 

All images have been taken by me first hand but here is also a citation for History in the Making:
History in the Making. (2011). Historical Reconstruction Specialists. Research re-created WW1 trousers. 13th October.

Monday, October 10, 2011

Research: Army Trousers

 I've been finding it difficult to find good images of army trousers in the First World War. I've been successful in finding images of men in full suits, jacket including. I've been able to find some good detail for how they looked wrapped with the putties, but not at the waistband. At this point my research is somewhat inconclusive. I've made an appointment to look at a historically re-created pair later this week but here is some of my initial research:
Masters, J. (1965). Fourteen Eighteen. London: 
Michael Joseph Ltd.
Carmen. W.Y. (1957). British Military Uniforms from 
Contemporary Pictures, Henry VII to the     
Present Day. London: Leonard Hill Limited.


Liddle, P. (1979). Testimony of War 1914-1918. Great Britain: Butler and Tanner Ltd. 
Out of all my research images for the trousers I feel like these are some of the stronger. The first image is of a smart young officer, maybe some context into what the soldier might have been like before he deserted. I think this is a good image of how the putties might have been wrapped and the way the trousers hang around the knee. The second image (citation beginning with Liddle) is a great and rare image of the back of the trousers. It's easy to see how high they sit on the waist and the fish tail backs and where the braces sit and function. The third image is of a guardsman and is a good reference for how the trousers and putties look together.

All three pattern images from: Shep, R.L. (1998). The Great War: Styles and Patterns of the 1910’s. California: R.L. Shep Productions.

 This first pattern is of military 'service' knickers. This was one of the first patterns I feel could be useful in drafting my pattern. The back piece has a fish-tale back and they are clearly fuller around the hip to the knee. This might be more comfortable for the actor than having long trousers wrapped with gaiters however this pattern might not fit the rank of our soldier.

This pattern is not for a military trouser but rather a suit trouser from a pattern of that time. Since it is a long trouser that might be more useful  and there is no waistband which would fit in with the design. Also the back would be easy to make into a fish-tale back.

This is an interesting pattern option as well because it has a few different options. There is a full length trouser option, although it has a separate waist-band, which wouldn't really fit the design. The other options all have the potential to be drafted then altered to fit the design. Perhaps they could be made longer to be wrapped up or stay shorter and then popper into the putties. 

Through my research so far it has become clear that finding a real physical example would be the best research and the most effective research I could do. With what I have found so far I have many different options to discuss with my designer and to consider when I am drafting the pattern. 


Sunday, October 9, 2011

Research: Waistcoat

Men's Fashion Illustrations from the time, part of
Anushka's research as well
 When I initially began researching for my waistcoat I wasn't sure the best starting point. In some ways I was unsure my role within the costume of the Narrator, should I be working closely with Anushka, who was making the jacket and trousers, or focus on the waistcoat as a separate part and it's own distinct project? In the end the best research was a mix of both. I was able to discuss the general shape of the waistcoat, the length, and some design lines with Anushka based off of her research. I checked with Rose, the designer, about how many pockets I needed and if there was anything special that I needed to know for the part of the Narrator. Since this is a tailored suit I will be following what we learned in our tailored waistcoat unit last year. Once that information was gathered I did a little independent research to find more examples of what I was making.
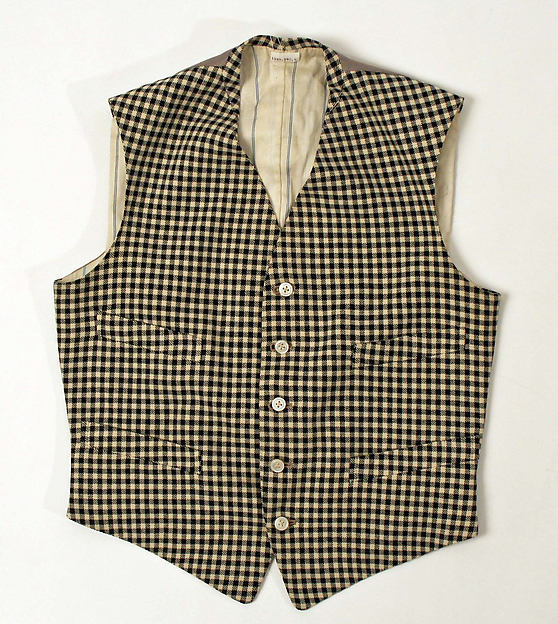
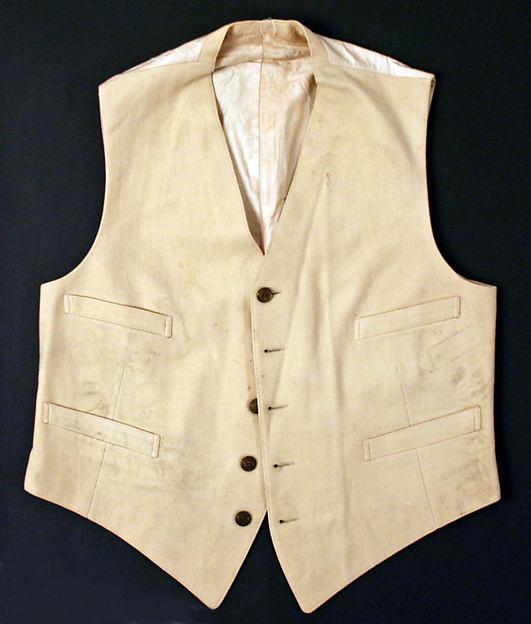
These three images were a lucky find. The are all from The Met Museum website. The front and back cream waistcoat was made in 1916, it is British made out of Wool. The Accession Number is: 1979. 152.8. The checked waistcoat is dated: 1910, it is British made of wool and silk cotton and the accession number is: 1984.160.4
These three waistcoats are a great example of what I will be making for the Narrator. Both are collar-less and have hem lines shaped similarly to the design. I thought it would be a good mix to get a waistcoat from 1910, the checked ( maybe a little earlier) and then one closer to when the play is set: the cream from 1916. Although the Narrator isn't a shabby character he's not overly wealthy and Rose has said she wants his costume to looked lived in but not worn out. The main differences between the early and later waistcoat is the shape in the center-front of the hem line. On the cream the curve is slightly more pronounced, and therefore might have been a little longer, whereas the checked waistcoat has a shallower curve and might have sat a little higher on wearer. These are both two good examples of a waistcoat fitting the historical context and the design of the character. 
Images References:
Men's fashion Illustrations from the time, Part of Anushka's research too.


Jno. J. Mitchell Co. (1990). Men’s Fashion Illustrations from the Turn of the Century. London: Dover Publications Inc.
M.J. & Co. , Checked Waistcoat. (1910). [Online image]. Available from:
[Accessed 10 October, 2011].
Whitaker & Co. Inc. Cream Waistcoat. (1916). [Online image]. Available from:
[Accessed 10 October, 2011].


Saturday, October 8, 2011

Research: Shirt


When researching the shirt I felt like it was really important to make sure it fit the context of the character. When talking to Rose she pictured him in a kind of undershirt. Not something that was formal or very stiff. Her design featured a small stand collar and a long button stand. Within my research I found it more relevant that there would have been a yoke or a short button stand (something more like a placket); even on an undershirt. This is some of the research I found: 
Cariou, G. Shep, R.L. (1999). Shirts and Men’s Haberdashery:1840-1920’s. California: R.L. Shep Productions.
This is one of the patterns I found for the shirt, you can see the use of a yoke for the front and at the shoulder. I think this is a strong pattern for a period shirt but a little too formal for this character.
Liddle, P. (1979). Testimony of War 1914-1918. Great Britain: Butler and Tanner Ltd. 


I think this is a really good image to represent the how casual the shirt could be in the context of the war. This was an especially good find because, aside from a few changes this is how the soldier's costume will look/be worn. The army trousers help up by a belt and wrapped around with putties and a casual shirt with the sleeves rolled up. But focusing on the shirt there are some major differences between this image and my design like: the size of the collar and the pockets. It's difficult to tell as well if the button stand ends or is the length of the shirt. 
Cariou, G. Shep, R.L. (1999). Shirts and Men’s Haberdashery: 1840-1920’s. California: R.L.Shep Productions.
This is the pattern Rose and I chose for the shirt. It is actually an historical undershirt from 1909, so even though the show was written and set in 1918 I think it is a good fit. The collar is the right size and shape. It also has the right type of button stand. It was very easy to go an talk to Rose about what she was expecting and I think with the breaking down techniques it will fit the design. It's simplicity in style and cut will make it more casual and understated on stage.

Friday, October 7, 2011

Learning Agreement and Time Plan

This is the description of my project from my learning agreement. It contains details on what the project is and how I aim to complete it.


Learning Agreement Proposal:
For my Specialist Practice project I will be making a tailored pair of WWI trousers including putties and an early 20th century shirt for the costume of Soldier in A Soldier’s Tale; a BSO/AUCB production performed at the Pavilion Ocean Room. All the pieces will be broken down according to the design. I will also be making a tailored waistcoat to accompany the three piece suit for the character of Narrator in the same production. I will be challenging myself by taking on a large tailoring project, including trousers which I have never made before, enhancing and developing those skills learned in the Level 5 tailoring unit. I will be developing and improving my pattern drafting skills, an area that I also haven’t had extensive experience in.
 By making a detailed work plan I will keep myself on track to meet all fitting dates and other production deadlines. I will use the library to research the era and production and look to outside sources when available to increase my historical and contextual understanding of my costume and the production. Whilst working on the project I will first challenge myself to investigate any problems independently using my research and independent judgement learned in previous units, before asking for tutor assistance. I will also work to develop my professional skills by communicating with the designer, supervisor, tutors, actors, and outside collaborators by asking questions thoughtfully and timely so that the creative and technical realisation of this project is completed; as well as working with the other making students to successfully finish all four designs as coherent representations of the designers vision. Overall this project will help me develop my sewing and pattern drafting skills to a more professional level. I will gain more experience in tailoring which will give me a wider skillset as a freelance maker. The opportunities to explore breaking down techniques and perfect my finishing skills are also valuable experiences to put on my resume.


Time Plan:
Before embarking on this project I've made a time-plan to better manage my time, set accomplish-able goals, and remember important dates and deadlines. Since this is a live project some of my personal deadlines are relative between two days and what I have written for each week is to help me stay on track. Other things like dress rehearsals, performance dates, and lectures I was able to include definitive dates and times. Here is my time plan for this project. Since this is the start of the project I'm sure things will change as the project continues.


Thursday, October 6, 2011

Buying Supplies


One of the keys of this project is working as a team for a live show. This means not only working as a making team but working with the designer and supervisor. Our production supervisor Grace sent out this message recently:

Original Message:
Hi Girls,
Hope your all well.
I haven’t yet received the budget however I want to get it clear in my head what is needed for each costume, so I can divide the budget accordingly.
Please could you all have a think about all the components of your costume, and email me everything you think you will need with an idea of how much of it as well. For example, fabric, cotton, buttons, trimmings, beading etc etc. 
This would be so helpful for me as I can then divide the budget between you all.

Thank you so much.
Look forward to hearing from you.
 Love Grace x

My Reply:
Hi Grace! Here is my list, I think this will be everything I need, but I'm also just guessing. And as for the amounts they are all kind of relative too, since I haven't made trousers or this style shirt yet.

Trousers:
Fabric: about 2.5 to 3 meters
At least two buttons for braces
canvas for at waist: not much maybe .25 meters
Closers (not entirely sure what will be used yet, snaps or hooks&eyes or a zipper so I'll get back to you on that)
Green thread 1 to 2 spools
Tailoring Basting thread: 1 spool

Putties:
1 meter of fabric maybe 1.5 to be double sure, especially if it's cheap
maybe a few snaps or hooks and eyes
a pair of socks
1 spool of thread to match socks

Shirt:
Fabric: about 2.75 to 3 meters (maybe 3 just to be sure)
8 buttons
1 to 2 spools thread to match fabric
maybe .5 meter stayflex for collar and cuffs

Waistcoat:
Fabric: 1 meter, maybe 1.5 is checked
size 3/8 buttons ( I don't have a copy of the design so I can't count them but maybe get two extra just in case one falls off or gets lost)
Silesia to match 3 meters
1 spool tailor's basting thread
1 to 2 spools thread
canvas about 1.5 meters
small amount of stayflex

Okay I hope this helps! Let me know if you think something's missing or if you need more info!
Emily Manning x

Reflection:
When I received this email initially I was anxious about writing my reply. I wasn’t sure I could accurately judge lengths needed or possibly know all the supplies. I’m sure Grace wasn’t seeing this preliminary list as all we will ever need but I wanted to make it as detailed as possible. I think this was actually a helpful opening exercise. It got me thinking about all the supplies I will need and the potential making process for each garment. In future projects where I buy the supplies it'll be important to make lists like this throughout. As a free-lance maker I may need to quote an amount for the supplies for the client and making a supplies list will be key.  As a maker I also really appreciate that our supervisor is keen on getting us all the supplies we need as soon as possible, by taking the initiative at the beginning of this project it will, hopefully, make getting the supplies smoother for both of us.

Tuesday, October 4, 2011

SP Introduction to Project


Initial Meeting with: Designer: Rosalie Tyack, Supervisor: Grace Mortlock, and fellow Makers: Anushka Tay, Beth James, and Emily Hudson.
Front Cover of Histoire Du Soldat. (n.d.) [Online image]. Available from:
[Accessed 18 October, 2011].


Our first official meeting for A Soldier’s Tale was very exciting. It was an opportunity to meet with the Designer: Rose, and the Supervisor: Grace, and my fellow makers: Anushka, Beth and Emily. We started by listening to a description and summary of the show by Rose and then a look at her costume designs, as well as, a brief explanation of the set. This was our opportunity to ask questions and to also get to know more of the show than just the costumes. We discussed dates, the interaction with the orchestra, short documentary on the making of, and the music. Mostly we discussed the costumes and Characters. Here is a small brief description for each character:
Narrator- wears a three piece suit of the era with many pockets to store props, remains the same throughout the show
Soldier- wears a men’s shirt, WWI army trouser, and changes slightly throughout the show.
Devil- wears a body suit with added hips, cape and breast plate, and has 5 to 6 costume changes (quick changes) most of those will be sourced.
Princess- a flowing dress with lots of movement based on the era but not a re-creation,           and remains the same throughout the show.
 After looking over the designs we were allocated what we were to make. I am making the soldier’s uniform (shirt, trousers, and gaiters). I will also be making the waistcoat for the Narrator. We exchanged contact information and set about doing some research.
These are the two designs by Rosalie Tyack that I will be making. I will be making all of the Soldier's costume including, trousers, shirt and putties. For the narrator I will only be making the waistcoat. For more information on Rose's designs you can follow her blog here: http://rosebudcostumeblog.blogspot.com/

Evaluation: I felt like this first meeting was very successful. I had a limited knowledge of the show and what it entailed. It gave me a better understanding of the context of the costume within the show and the importance of my character. It was also helpful to talk to my fellow makers and know what they are working on so we can stay focused as a team throughout this live project. It was a good starting point because we received the dates of the show and the hand in deadline with the design and I could already begin thinking about a timeline. Although not every specific of each costume was discussed it gave me enough information to guide my research. Rose was able to put it in the context of: WWI, soldier from the British Army, costume/uniform is very worn. I was able to do my research (the next step) looking for images/patterns that were more specific but not restricting.