Sunday, February 26, 2012

London Fabric Trip

Although I mostly shopped locally for the fabrics for my underwear I planned a day in London for fabric shopping. I felt it was important to have a lot of variety and many different textiles to create the two top dresses. I knew Gold-hawk road would be sure to have a lot of choice and allow me to stay within budget. I allowed £150 to spend on fabrics in London.

To assist me while I was shopping I made these two print outs to take, rather than taking the whole book, so I could have a solid reference.

I think I may have been a bit ambitious in how many colours are in both dresses but it was a very helpful thing to have in my bag, throughout the day, to help me stay on task.

I am usually stressed when fabric shopping, always thinking about what the designer wants. However, since I am mostly my own designer/interpretor it was more free and I could choose fabrics based on my own thoughts on what would work. Before I went to London I sat down with one of my tutors and had a great discussion on what to look for and how much to buy. My strategy going on the day was to buy lots of different textiles with no need to buy more than a few meters of each. Even with the help of a prior tutorial and my design print-outs, I was still grateful for a friend who went with me. And after totalling up the final budget I was only about £6 over my allowed budget, which I think is a great success.

Here are the fabrics I found:


I am very pleased and confident in my fabric choices. I think  I got a lot of textiles that will laser cut well and some that can work on both costumes, not just one. The only thing I am concerned about is quantity. I don't want to start creating the dresses and discovering that I don't have enough of one or two textiles, but that is a risk I am going to have to take. This trip has been an exciting start to creating the dresses!


Thursday, February 23, 2012

Second Underwear Fitting


I am very happy with this second fitting. It was the second fitting for the corsets and the first for all of the other undergarments. It was exciting to see how everything came together.

Princess Silhouette Undergarments
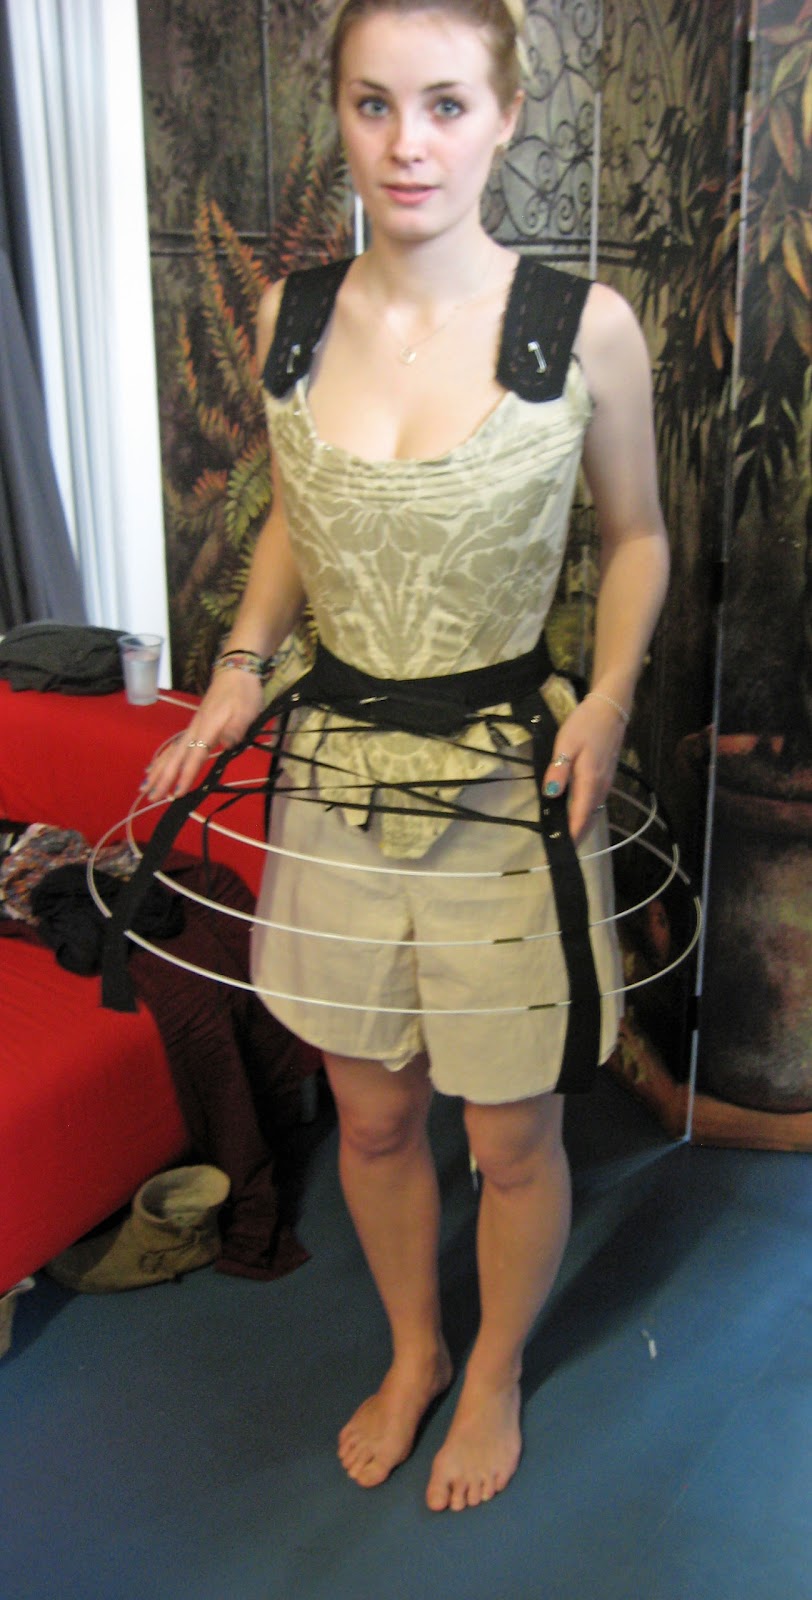
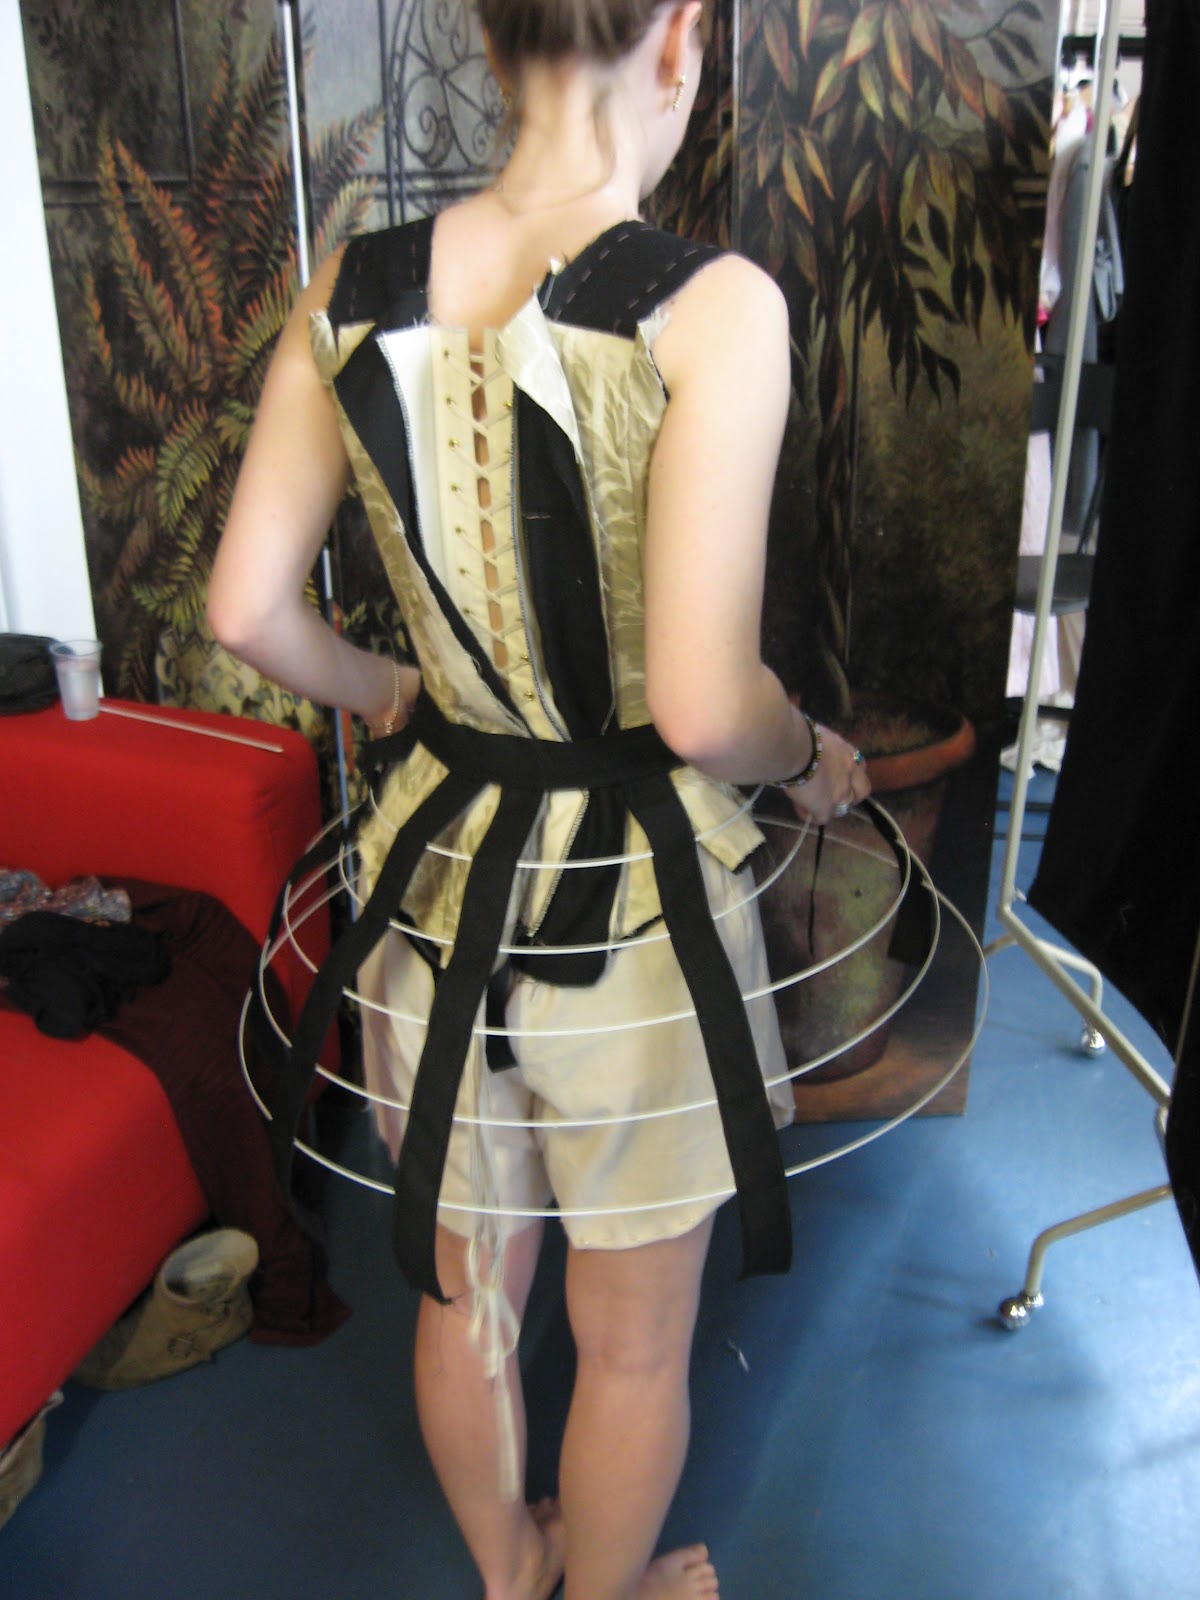
Worn by Camilla
I was very pleased with how everything came together for this costume. The corset fit very well after the adjustments from the first fitting and the bloomers came out well in the top fabric. I was also pleased with the size and length of the hoop skirt on my model. There are still a few adjustments to be made however. The corset tabs need to be adjusted somehow, something I will be working out more thoroughly on a mannequin. The bloomers need to be finished on the ends with some black lace but I was happy to see they hit the right spot on her leg even without the lace. And the cage needs the ribbons to decorate and the wire needs to be secured permanently so they will not shift around. 


 Princess Colour Undergarments
Worn by Rose


This fitting was also very positive in it's outcome. This was the first fitting for the corset in top fabric and it fit really well. The busk created a bit of a ridge in the center so I will be cutting that down a little to create a nice straight line across. The chemise looked how I wanted it to with the corset over-top but needed some adjustments when going from the mannequin to my model. The straps kept slipping so I will be using very thin elastic to correct that. Aside from a few areas needing finishing the hoop skirt worked well. The second rung down is just a little short so a longer cut will be inserted but other-wise it fits well. I also think on this hoop skirt the length is very appropriate for the design and the length of the chemise finishing a little higher also works with my sketch.


Evaluation:
These were very positive and motivating fittings. It was much easier just having one costume to focus on and I think I will continue to only do so until maybe the last few fittings for the dresses. What was most satisfying for me was to see the high contrast between both corsets. The difference in shape is such a huge part to creating the characters and differentiating them, I feel much more confident that it will be seen clearly in the shape. I think I was also more pleased with the standard that these garments were at for a fitting; seeing everything in the top fabric gave me a much better visual of how the finished products will look. Comparing my two different roles (one as maker and one as designer) I can say I feel good about both. As a designer I am pleased with my fabric choices and how the pieces work together and aesthetically mesh. As a maker I am please that the garments look like the designs and fit the models appropriately.

Inserting a Busk

Although this blog isn't a step by step of exactly how I am making my costume I wanted to include these steps on inserting a busk. It is something I have never done before and just having a record of this new process will be helpful in future projects. So here are just a few quick notes I took looking at the sample the tutors had of each step.

Left Side When Worn: 

*Draw a straight line down the centre front and mark off the holes according to how far apart it is on the busk and place it in a little in from that line.
*Mark over from that line the width of the busk +.6inches
*Trim left-over seam allowance
*Carefully poke holes for the busk
*Slide busk part in filling the holes
*Fold over and slip-stitch


Machine top-stitch close to the busk.

Right Side When Worn:

*Cut extra piece the length of the Centre Front including seam allowance
*This piece is 1inch wide with 1inch seam allowance on one side and .5 s/a on the other
*On the centre front mark off the distance of each loop on your piece and the width of each so you can stitch in-between the pieces leaving spaces for the loops.
*Trim the seam allowances and fold over the .5 seam allowance on one side.
*Slide in busk and slip stitch folded over side.
*Machine top-stitch close to the busk.


 Finished!


Sunday, February 19, 2012

Draping the Chemise

After I had dyed my fabric and all of that was ready I could begin draping my chemise. to begin with I wanted to plan out my neckline. Since lace was going to be the actual straps my plan was to mark out my neck-line on the mannequin and then pin the fabric to the form ready to be attached to the lace when it was ready. 

Here is my marked neck line
 Next I began draping the cotton voile on the form. I started by cutting two pieces the length I wanted it to be; one for the back and one for the front. I used the entire width of the fabric because it needed to be a little bigger so it could slide over the head easily. Then I just started to work with the fabric and this is what I ended up with:
Front
As you can see the front has more small pleats around to create a slopping neck-line. Where-as the back has just one really big pleat in the centre back as the focal point.
Back
In the end I did cut off quite a bit of seam allowance and excess. I wanted it to be roomy but not massively big. I planned on using french seams to finish the side seams so I could pin it right together on the form.

At this stage I still hadn't decided on my lace so, although I wasn't going to use it, I pinned on the original lace I bought to see how it worked with the fabric.


With Original Lace
I was actual very surprised to find that I didn't particularly like this lace on the chemise. I feel like it looks a bit heavy and is maybe even a little too wide. Although I still really like this lace and will use it in some capacity on my costume I don't feel like it really fits here. 
Second type of lace
I found this second type of lace in my room when I was looking through some of the lace I already had. I'm not too sure where it came from but I thought that since it is a little more narrow it might be a good comparison to the other lace. I think this is actually a much better fit both in style and width. I like the scalloped edges and the straight edge would make it easier to attach to the cotton voile.

I've tacked this lace on the chemise ready for the second fitting and after that I will decide to either keep this black lace or find something different.

Saturday, February 18, 2012

Dying the Bias Binding

 For the Princess Colour's Corset I decided on a cotton bias binding. I was originally thinking of doing it in black bias binding to match Princess Silhouette's but it was too bold a look. And investigating my historical research it was colour matched rather than a different colour. I could have made my bias binding out of my top fabric but I had problems with the pattern showing through the underside and I didn't want to take the risk of it looking sloppy. The bias binding I found was a cream and I thought that compared to the swatch I had brought it was a good match. Once I was able to put it against the corset it was clear it wasn't the best match. So I did a bit of tea dying to make it a little closer.
Tea on Left, Bias Binding on Right


Dyed Bias Binding
It took two bags of Twinnings Lady Grey and about 7 minutes to dye the binding. I made sure to work in my kitchen in the afternoon when there was a lot of natural light so I could really gauge the colour. I think this was a successful solution for my bias binding and I think it matches well with the colour of the corset. Most importantly it doesn't stand out which is mostly what I wanted the bias binding to do; blend in.

Making the Bloomers

I just wanted to make a quick not on how I made the bloomers for my own record. The cotton voile is very thin and I wanted it to be a bit denser than the chemise. I decided to use two layers of the cotton instead of just one. I really wanted these to be completely finished inside and out, preferably without any over-locking. I feel like all those threads would show through some how and keeping a common technique with the chemise I decided to French seam them. I made both the inside and the outside 'pair' first and then put one in the other and top-stitched down each side leg to hold them together. I feel like this was the best way I could have done them because all the seams are neat and tidy and match and the layers aren't pulling on each other and there is still a lot of movement. The two layers are attached together at the outside side seams as well as at the waistband so they won't move apart at all.This also gave me a great opportunity to improve my French seaming abilities working on both straight and curved seams.

I also wanted to strengthen the waist-band without it showing through or looking heavy. I did a few testers with a few different fabric strengtheners. I tried: white stayflex, cotton vilene, and a dress-makers interfacing. All three did their job but the vilene was the best. It was still light but didn't show through as much. It was worth doing a few samples to get the best material to work with the bloomers.
Sample with different backings

Wednesday, February 15, 2012

Dyeing Chemise and Bloomer Fabric

Samples in a Row with Original on the Left
For my chemise and my bloomers I wanted to use the same fabric for both and wanted a soft champagne type of tone. I knew the fabric needed to be light and delicate. It became very apparent that I would not be able to find the type of fabric I wanted in the colour I was looking for. I resigned myself to getting a white 100% cotton voile that I knew would dye well. I decided to do a home dye to fit a busy schedule and the limited availability of the dye room. I had two dylon dyes: Powder Pink and Dark Brown. I did about 6 small samples at various times and dye strengths. The first sample I left in for 8 minutes and there was almost no change. I added more pink and left in for 10minutes with almost no change as well. After that I added an equal amount of pink and brown dye and left samples 3 to 6 in for 10 minutes, 20 minutes, 30 minutes, and 40 minutes respectively. After looking at them in a row samples 3 and 3 are by far the most successful because they aren't too dark and nice mix of pink and brown. I was anxious that there wouldn't be enough dye to do all 5 meters of my cotton so I emptied the tub and started again. I think this wasn't the brightest idea because I mixed new dyes and they were slightly stronger than the ones I had used on my samples. I think the brown was stronger than the pink rather than being even; if they had both been the same strength it would have been fine because only the amount of time it was in the dye would have changed. But I panicked when I put the dye in and saw how fast it was picking up the brown. Instead of leaving it in for 10 minutes like I had planned I took it out after 5 because I didn't want it to get too dark. I initially felt the fabric was too dark in colour but as it was drying it got lighter and I was really pleased with it. Unfortunately I had a similar mishap when I got into university as I did with the lace. In the lighting at uni (which is more of a natural true light) the fabric was very pink instead of being a nice champagne. To make it more brown and the shade I was looking for my tutor suggested tea dyeing it a little. I used 6 bags of Twinning's Lady Grey which made my room smell amazing. And let the bags steep for a little and put the voile fabric in for 30 minutes, took it out rinsed it and put it back in for another 25 minutes. This result was much closer to the colour I wanted and a much better fit for my costume and design.

On Left: Original Fabric Swatch on design/ On Right: Finished Dyed Fabric Colour